


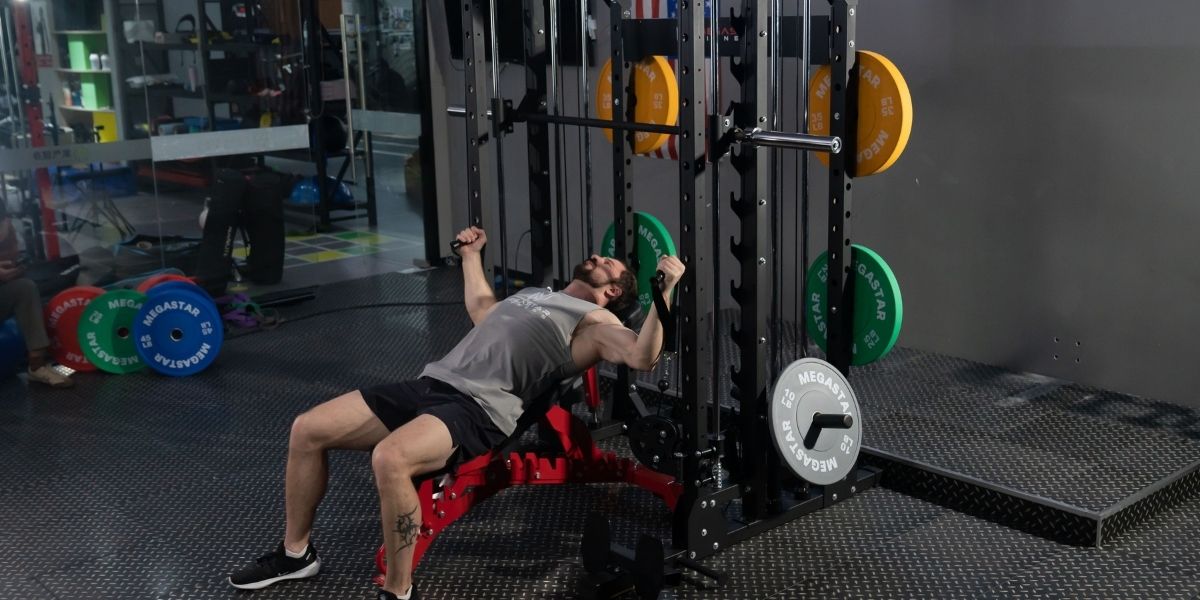
Maximizing your workout with Smith machine squats combines stability and safety, allowing you to focus on muscle activation and proper form. While it reduces the risk of injury and helps target specific muscles, the fixed bar path can limit natural movement.
Now, let's dive into the key benefits of using the Smith machine, along with the challenges to be aware of, and how to make the most out of this exercise for your fitness goals.
Benefits: Why Smith Machine Squats Work
Enhanced Stability
The fixed bar path reduces balance demands so you can focus on depth, tempo, and tension where muscles grow.
Reduced Risk Of Injury
Built-in safeties and a guided bar help prevent missed-rep falls and awkward bails when training alone or at home.
Targeted Muscle Activation
Small stance and foot changes bias quads, glutes, or hamstrings without changing the exercise.
Cleaner Technique Practice
Stable reps make it easier to learn bracing, knee tracking, and consistent depth before progressing to free-bar squats.
Progressive Overload Potential
Lower stabilization demands often let you push more complex sets for hypertrophy while keeping one to two reps in reserve.
Challenges: What To Watch Out For
- Fixed Path And Alignment: If foot and bar alignment are off, rails can force uncomfortable joint angles (see Setup).
- Reduced Stabilizer Engagement: Balance and core are trained less than with free weights—plan extra work.
- Limited Carryover: Strength transfer to free-bar squats is helpful but not one-to-one.
- Machine Differences: Rails can be vertical or angled; your body position must match (see Setup).

How to use Smith machine: Make The Machine Fit Your Body
Check Rail Direction (Vertical Vs Angled)
Look at the uprights. Vertical rails move straight up and down. Angled rails tilt slightly. Face the direction that lets your hips descend with the rails so the bar stays stacked over your base.
Set Bar Height And Safeties (One Inch Below Target Depth)
Set the bar just below shoulder height so you can unrack without tiptoes. Place safeties about one inch (2–3 cm) below your most profound planned depth.
Choose Foot Placement By Goal
- Balanced Build: Feet shoulder-width, toes slightly out, midfoot under the bar line.
- Quad Focus: Heels on a wedge or small plates, torso more upright, controlled knees over toes.
- Glute And Hip Focus: Slightly wider stance, sit back a touch, maintain full-foot pressure.
Brace And Breathe
Big breath, ribs down, light glute tension, firm grip. Exhale through the sticking point.
Anchor Cue (single source): Keep the bar stacked over your midfoot from start to finish. If unsure, film a side view once and adjust.
Warm-Up And Mobility
General Warm-Up
Five to eight minutes of light cardio (bike, brisk walk) to raise temperature and heart rate.
Dynamic Mobility
- Ankle Rocks: Two sets of ten per side.
- Hip Openers: Two sets of eight per side (standing or half-kneeling).
- Bodyweight Squats: Two sets of ten with a two-second pause at the bottom.
Ramp-Up Sets
Before working weight:
- ~40–50% × 6–8 reps
- ~60–70% × 4–5 reps
- ~80–85% × 2–3 reps

Technique: Build A Repeatable Rep
Descent (Two To Three Seconds)
Unlock, sit between your hips, knees track over toes, heels stay planted. Lower in two to three seconds.
Bottom (Zero To One Second Hold)
Hold for zero to one second just above the safeties with a neutral spine and tall chest (avoid overextension).
Ascent (Drive Through Midfoot)
Drive through the midfoot, keep knees over the second–third toe, and maintain your torso angle.
Common Mistakes And Quick Fixes
- Bar Drifts Toward Toes: Move feet back slightly so the bar stacks over midfoot; slow the eccentric. See Anchor Cue.
- Heels Pop Up: Use wedges or weightlifting shoes; cue “push the floor away.”
- Knees Cave In (Valgus): Open toes a touch, widen stance slightly, reduce load, and train with a steady tempo.
Programming: Simple Plans That Deliver
Beginner Skill Block
- Three sets of eight to ten reps, RPE 6–7
- Tempo: three seconds down, slight pause, smooth up
- Add five pounds only when all sets are smooth and pain-free.
Hypertrophy Block (Most Users)
- Four sets of six to twelve reps, RPE 7–9, sixty to ninety seconds rest
- Optional one-second pause at the bottom
- Increase weight when you hit top reps on all sets twice.
Strength With Control
- Four to five sets of three to six reps, RPE 7–8, two to three minutes rest
- Use one- to two-second pauses to build starting strength.
Weekly Frequency
Train Smith squats one to two times per week. Pair with hamstrings (Romanian deadlifts, leg curls) and one single-leg pattern.

Progression: Double Progression And Four-Week Example
Double progression: keep weight static and add reps within the target range each week. When you hit the top of the range across all sets, add two to five pounds and reset to the low end.
Four-week hypertrophy example:
- Week 1: Four × eight at RPE 7
- Week 2: Four × nine at RPE 7–8
- Week 3: Four × ten at RPE 8–9
- Week 4: Add five pounds, return to Four × eight at RPE 7–8
Variations: Choose The Right Tool
- Heels-Elevated Smith Squat: More knee flexion and quad tension; helpful with tight ankles.
- Front-Style Smith Squat: Upright torso, big quad focus, less back stress.
- Smith Split Squat or Bulgarian Split Squat: Single-leg strength, hip stability, strong glute stimulus.
- Paused or One-And-A-Half-Rep Squats: Increase time under tension to break plateaus.
Accessory Pairings
For Quads
Leg press or hack squat three × ten to twelve, leg extensions two to three × twelve to fifteen.
For Glutes And Hamstrings
Hip thrust four × eight to twelve, Romanian deadlift three × eight to ten, seated leg curl three × ten to twelve.
For Core And Stability
Plank three × thirty to forty-five seconds, dead bug three × eight to ten per side, side plank two × thirty seconds per side.
Troubleshooting: Pain And Plateaus
Knee Pain
Check a side video. Keep the bar over the midfoot (see Anchor Cue). If you pitch forward, reduce heel lift or narrow stance. Lower in three seconds and stop at a pain-free depth.
Low-Back Discomfort
Limit depth to where the spine stays neutral. Use a small heel wedge to stay more upright. Add dead bugs and bird dogs between days.
Heels Lifting Or Toes Rising
Use wedges or slight-heel shoes. Keep full-foot pressure and slow the eccentric.
Knees Caving In
Open toes a little, widen stance slightly, and cue “knees follow toes.” Lower the weight and keep the tempo strict.
Not Feeling Target Muscles
Pre-activate with leg extensions (quads) or glute bridges (glutes). Use two- to three-second lowers and a one-second pause.
Stalled Progress
Deload for one week (two to three sets), then resume with a slight load increase. Rotate paused or one-and-a-half-rep squats for two weeks, then return to normal tempo.

Sample Workouts
Thirty-Minute Beginner
- Smith Squat: three × eight to ten (three seconds down)
- Smith Romanian Deadlift: two × ten
- Bodyweight Split Squat: two × ten per leg
- Standing Calf Raise: two × twelve
Forty-Five-Minute Hypertrophy
- Smith Squat: four × eight to ten (one-second pause)
- Leg Press: three × ten to twelve
- Smith Split Squat: three × ten per leg
- Seated Leg Curl: three × ten to twelve
Glute-Focused Day
- Hips-Back Smith Squat: four × six to eight
- Hip Thrust: four × eight to twelve
- Bulgarian Split Squat: three × ten per leg
- Back Extension: three × twelve
FAQ: Fast Answers
What is a Smith machine?
A Smith machine is a squat and press station with a bar that rides on guide rails. The bar hooks into racking pegs along the uprights, and most units include safety stops. Many models use a counterbalance so the bar feels lighter at the start.
How much weight does a Smith machine take off?
The counterbalance offsets part of the raw bar weight, so the starting resistance is often near zero to about twenty-five pounds, not forty-five. In practice, many machines “take off” twenty to thirty pounds compared with a standard forty-five-pound free bar, but this varies by brand, angle, and friction. Use the scale tests above to get the exact number for your machine.
How Deep Should I Squat?
As deep as you can with a neutral spine, stable knees, and heels down—parallel or deeper if pain-free.
Action Plan: Keep It Simple
Pick a primary goal (quads, glutes, or balanced). Match foot placement to that goal. Follow the Anchor Cue to keep the bar over the midfoot. Use a controlled two- to three-second descent—progress in small pounds. Train one to two times per week, pair with hamstring and single-leg work, and apply the troubleshooting steps to stay pain-free and consistent.
